Booting Process, ACL, Processes, Process State, Alias in Linux
Day-6 : Linux Workshop

Student, COEP'27 | DBATU'24 | Member of CSI COEP | Full Stack Developer | DSA Enthusiast | Explorer |
Booting Process
- The booting process refers to the series of steps that take place when a computer starts up and loads the operating system into memory, it involves several stages and those are listed below.
Stages of the Booting Process
BIOS (Basic Input Output System)
When the computer is powered on, the BIOS is activated.
It performs the Power-On Self-Test (POST), detects and initializes essential hardware components, and locates the boot device (usually the hard drive or SSD) that contains the bootloader.
MBR (Master Boot Record)
When the computer starts up, the BIOS executes the code in the MBR.
The structure of the MBR consists of three primary components:
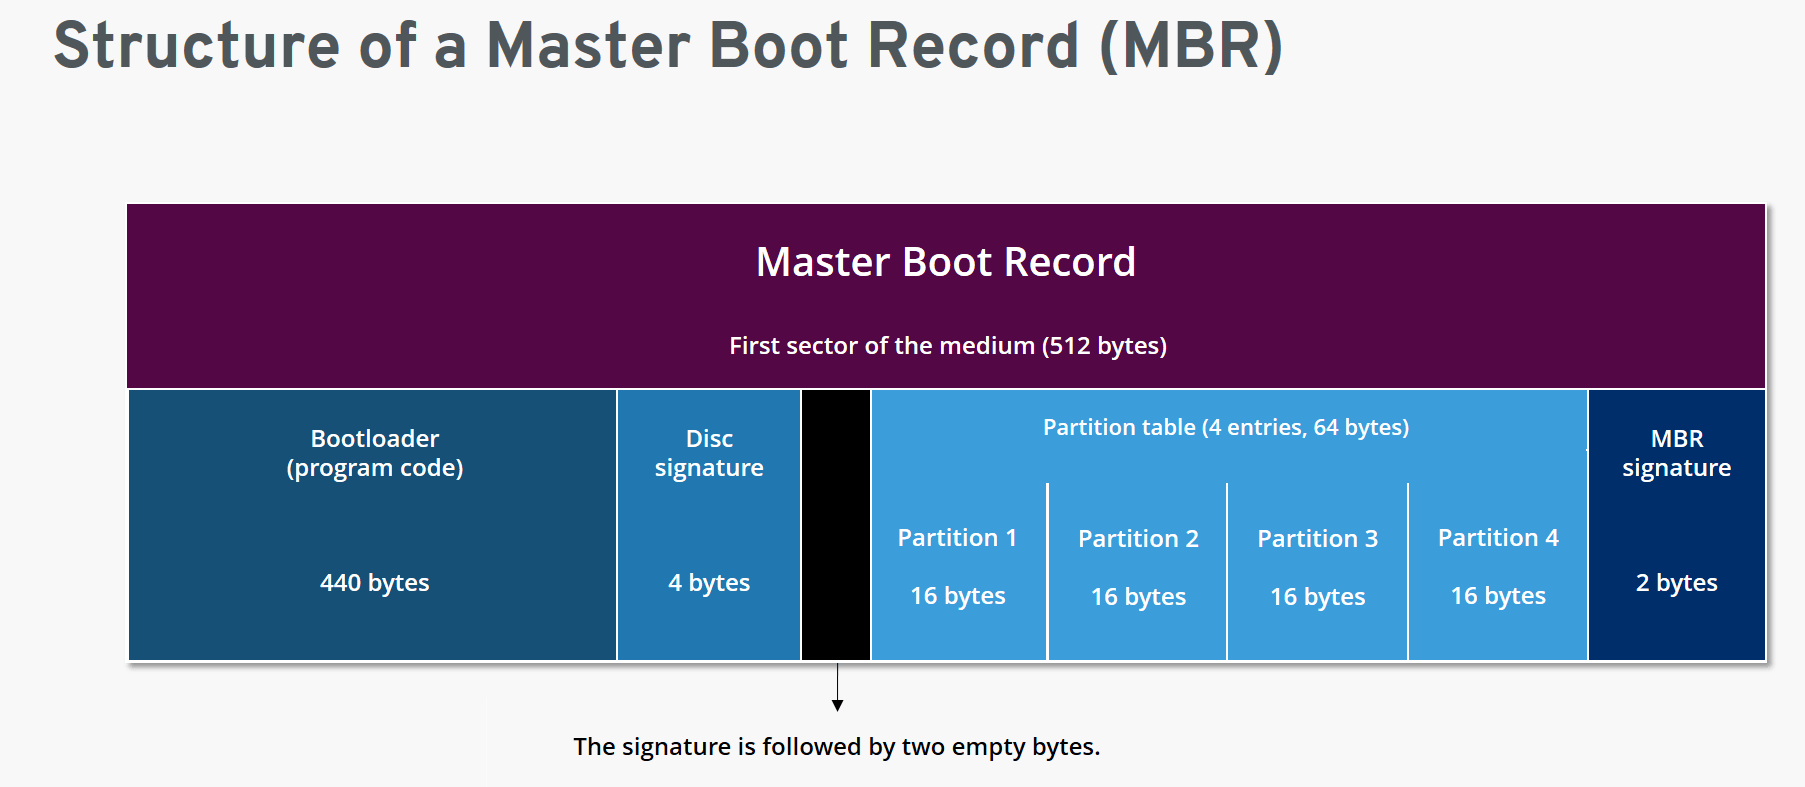
Bootloader: The MBR contains a small piece of executable code called the bootloader, which is responsible for locating and loading the main bootable partition.
Partition Table: The MBR also contains a partition table that can hold information about up to four primary partitions on the storage device.
Magic Number (Parity Bits): It acts as a simple form of data validation and if any part of the MBR is corrupted or altered, including the magic number, the BIOS will not consider it a valid bootable device.
GRUB (GRand Unified Bootloader)
GRUB is a popular bootloader used in the booting process in Linux.
It plays a critical role in the boot process by allowing users to choose which operating system to boot when multiple operating systems are installed on the same computer.
The different versions of GRUB that have been developed over time:
GRUB 1 --> Getting code from MBR
GRUB 1.5 --> Allows file system to communicate with hardware
GRUB 2.0 --> Main GRUB image, /boot/grub2/grub.conf -->Loading of kernel
Kernel
It initializes & configures computer memory and hardware.
Uncompressed itself & mount it.
Loads the required drivers for it.
Initialize virtual devices into the system.
Create a root device mount into read-only memory.
Freeze unused memory.
init.d / system.d
It is the first process (mother of the process) after the kernel step.
Mounting the file system --> /etc/fstab
Starting services
Device attaching to the system
Identify the default target
Run Level
#Commands:

#The "who" command is used to display the current run level & system's last reboot time
who -r
___________________________________________________________________

#The "init" command is used to change the system's run level, which represents a specific operating state
#Syntax:
init <runlevel>
#Example:
init 5
init 3
___________________________________________________________________

#The default target determines the operating state in which the system will boot by default
systemctl set-default multi-user.target
systemctl set-default graphical.target
___________________________________________________________________

#This command is used to check the default target
systemctl get-default
___________________________________________________________________

#List of Run Levels:
0 - Halt state (poweroff.target)
1 - Single user mode (rescue.target)
2 - Mutli user mode without networking
3 - Mulit user mode with networking
4 - User Definable
5 - GUI (graphical.target)
6 - Reboot
ACL
ACL stands for Access Control Lists.
It allows you to give separate permissions to individual users or groups on files and directories in a file system.
Allowing you to define more fine-grained permissions for specific users or groups.
#To set ACL on a directory:
#Syntax:
setfacl -m u:<user>:<perm> <dirname>

#Example:
[root@localhost tmp]# setfacl -m u:testuser:rwx TestACL/
[root@localhost tmp]# ls -ld TestACL/
drwxrwxr-x+ 2 root root 41 Jul 19 12.00 TestACL/

#To show the list of users and groups with their respective permissions on the specified file or directory:
#Syntax:
getfacl <dirname>
OR
getfacl <filename>

#Example:
[root@localhost tmp]# getfacl TestACL/
#file: TestACL/
#owner: root
#group: root
user::rwx
user:testuser:rwx
user:robot:rwx
group::r-x
mask::rwx
other::r-x

#To remove the ACL (remove a single user at a time):
setfacl -x u:testuser: TestACL/
#Verifying...
getfacl TestACL/
user::rwx
user:robot:rwx
group:r-x
mask::rwx
other::r-x

#To remove the ACL (remove all users at once):
setfacl -b TestACL/
#Verifying...
getfacl TestACL/
user::rwx
group::r-x
other::r-x
Processes
The Process represents the execution of a specific task or job on the system.
Every action you perform on a computer involves one or more processes.
Types of Processes
Parent and Child Processes :
When a new process is created, it is referred to as the "child process" and the process that creates it is called the "parent process".
Parent processes are processes that create and manage other processes.
If the process creates additional processes as part of its execution, those are considered child processes.
Zombie Processes :
The processes that have completed their execution but still have an entry in the process table.
Zombie processes do not consume system resources and are usually cleaned up automatically by the system.
Orphan Processes :
- Orphan processes are child processes whose parent processes have terminated unexpectedly before collecting their exit status.
Process State
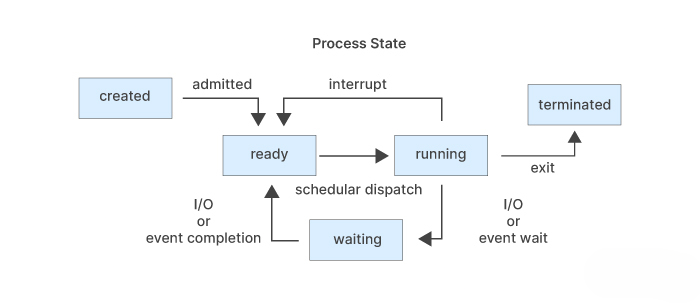
A process state refers to the current condition or status of a running process.
The process state indicates what the process is currently doing or waiting for in the system.
Commands Related to Processes in Linux
Top Command
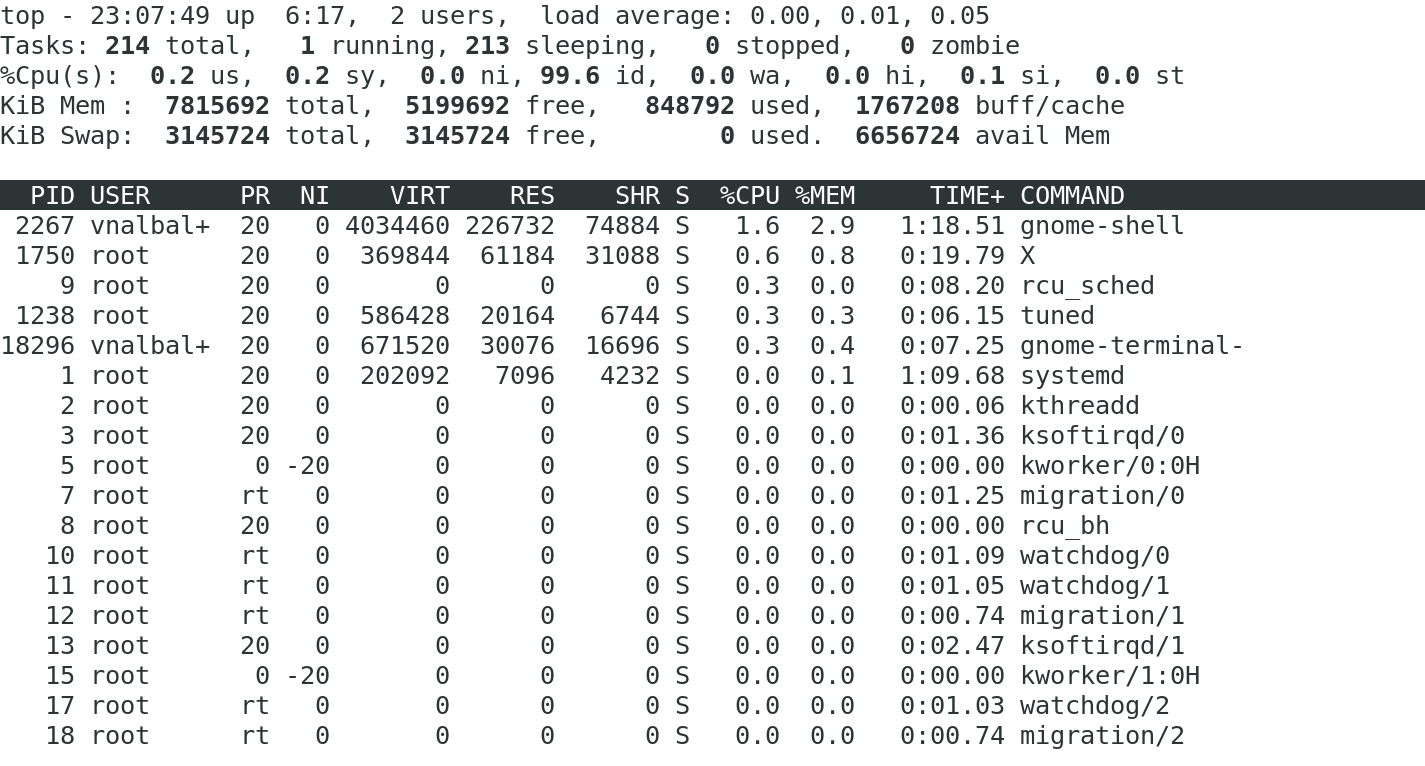
#This command provides real-time dynamic monitoring of system processes,
#CPU usage, memory utilization, and other system statistics in an interactive shell
[root@localhost ~]# top
To list the processes that have "<word>" in it
#Listing the processes having word "top" in it
#Used to list all running processes and
# filter the output to display only the lines containing word "top" using grep command.
[root@localhost ~]# ps -ef|grep top
To assign higher or lower priority to a new process
#Syntax:
nice -n <nicenessValue> command

#Example:
[root@localhost ~]# nice -n -5 top
The "nice" command is used to execute a command to modify a niceness value.
The nice command is used when starting a new process to set its initial priority.
The niceness value is an integer that ranges from -20 to +20.
The lower values indicate higher priority. A process with a higher priority (lower niceness value) will be running more frequently compared to processes with a lower priority.
To assign higher or lower priority to an existing process using its PID
#Syntax:
renice -n <niceness_value> <PID>

#Example:
[root@localhost ~]# renice -5 3030
#Here, 3030 is pid for command top
To terminate, kill, resume or suspend a process
#Syntax:
kill <signal> <PID>

#Signals:
Terminate : -15
Kill : -9
Resume : -18
Suspend : -19

#Example:
kill -9 3030
OR
kill -15 3745
Jobs command
- The command "jobs" is useful when you are running multiple background processes and need to keep track of their status or interact with them.
#Command
[root@localhost ~]# jobs
Alias
An alias is a user-defined shortcut or nickname for a command or a sequence of commands.
Aliases allow users to create their shorthand notation for frequently used or complex commands, making it easier and faster to execute them.
#Defining an Alias (Syntax):
alias aliasName="command_or_commands"

#Example:
alias viraj="ls -lrt"

#You can define the alias in the .bashrc or .bash_aliases file
#Defining the alias in the interactive terminal/shell is temporary, to define it permanently write the alias in .bashrc file